
Tutorials
How to Make an AI Short Film
Complete step-by-step guide. Create characters, generate scenes, add voice and sound, edit on the timeline, and export a finished film.
AI Character Consistency
The biggest challenge in AI filmmaking. Learn how to create characters that look and sound the same in every scene.
AI Storyboarding on a Node Graph
Why a node graph is better than a prompt box. Plan your entire visual story on an infinite canvas with reusable characters and connections.
AI Video Generation: Every Mode Explained
Image-to-video, text-to-video, first-and-last-frame interpolation, talking avatars, and lipsync. Five video modes and when to use each one.
AI Voice Acting & Sound Design
Give your characters voices with AI voice cloning, generate atmospheric sound effects, compose background music, and mix it all together.
Getting Started with StoryNote
StoryNote is an AI filmmaking studio that runs in your browser. You build a film on an infinite canvas where every character, scene, and sound is a node you can connect together. There's no install, no setup, and no complicated prompt engineering — just a visual graph of the story you want to make.
Credits power every AI generation — images, video, voice, music, and sound effects. Different models cost different amounts, so you can run many quick generations on the Fast tier or save your credits for a few high-quality shots on the Quality tier.
Open the app and you'll land on a blank canvas. From here, you can right-click anywhere to add a node, or press Cmd+K to search for the node type you want. The first thing most people do is add a character.
Signup tip

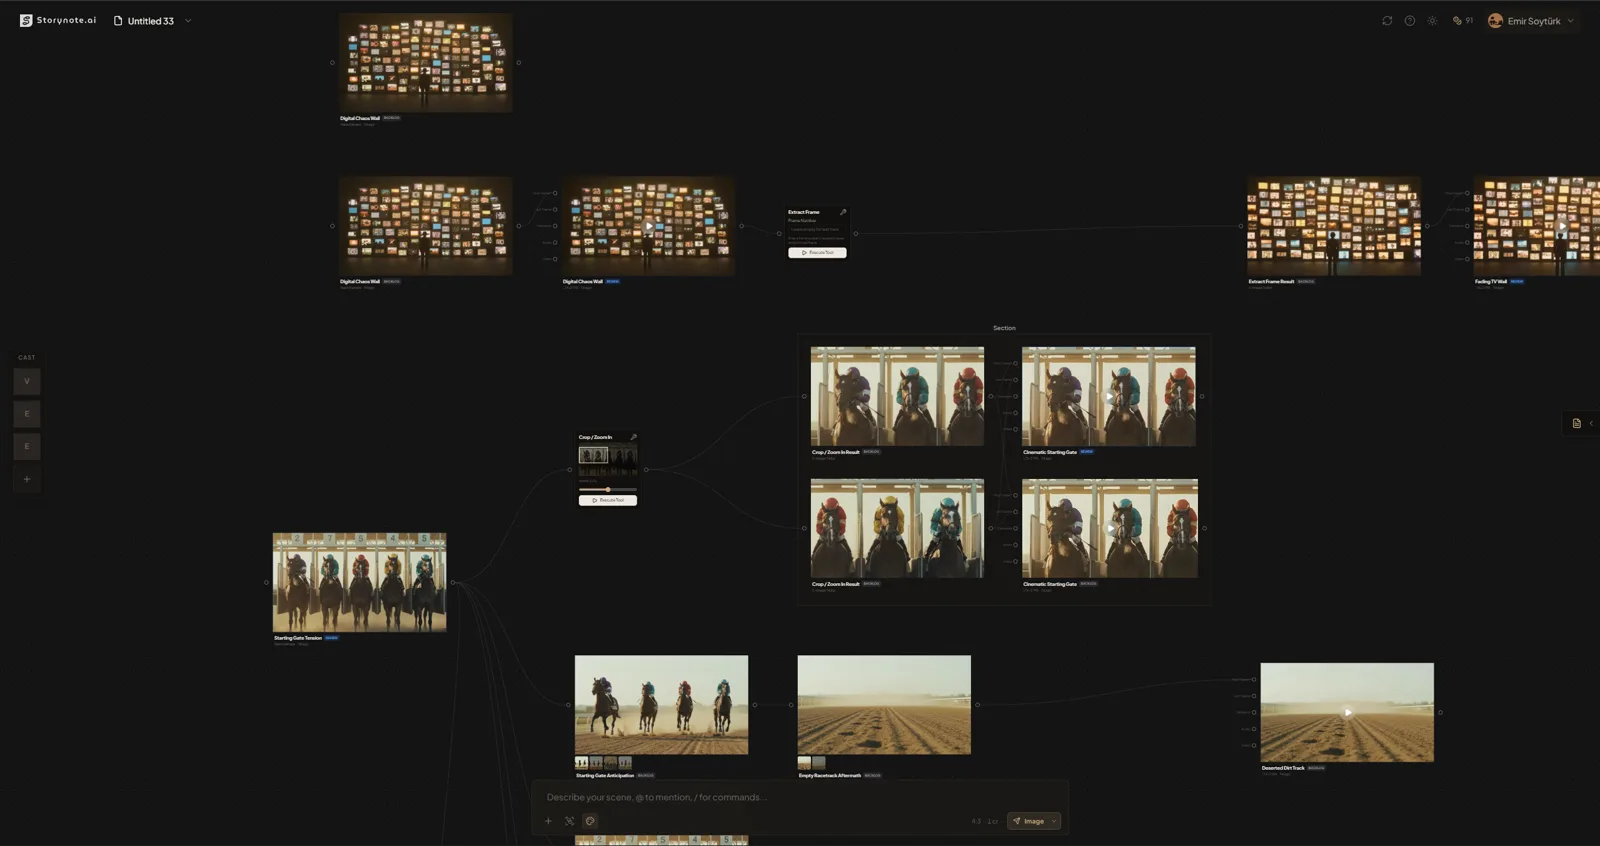
The Canvas: A Node Graph for Your Story
Most AI tools ask you to write one prompt and pray. StoryNote takes a different approach: your story lives as a visual graph on an infinite canvas. Each node is a building block — a character, a scene, an audio clip, an effect — and you connect them together to say what depends on what.
The canvas has a few core node types you'll use all the time:
- Element nodes — characters, props, and locations. These hold reference photos and descriptions that get reused across every scene.
- Output nodes — where you write a scene description and generate an image or video. Connect elements to an output node and they'll appear in the generated shot.
- Sound nodes — speech, sound effects, or music. Connect a sound node to a character to clone that character's voice, or to a video for lipsync.
- Tool nodes — post-processing operations like object removal, background erase, upscaling, relighting, or canvas expansion.
- 3D scene nodes — generate a full 3D world from a prompt, move the camera, and render stills or video from any angle.
Connecting nodes is how you tell StoryNote "this scene uses this character" or "generate a video from this image." Drag from a node's handle to another node to create a connection. The output node reads its connected inputs and builds the final prompt automatically.
Deep dive
Generating Your First AI Image
Once you have a character, generating a scene with that character takes about thirty seconds. Right-click the canvas, choose "Add Output node," and drag a connection from your character element to the new node.
In the output node, write what you want to see. Keep it cinematic and concrete: "Sarah walks into a dimly lit office, rain visible through the window, desk lamp casting warm light". You don't need to describe Sarah's appearance again — StoryNote already knows.
Before you hit generate, you can set a few options on the node:
- Aspect ratio — 16:9 for widescreen, 9:16 for vertical, 1:1 for square, and others in between.
- Model tier — Fast for quick iteration, Balanced for most work, Quality for your hero shots, and Beast mode when you want the best result and don't care about the cost.
- Style preset — cinematic, anime, watercolor, and more. We'll cover this in the next section.
Hit generate. The node shows a progress spinner with the credit cost and estimated time. When it finishes, the image appears inline. Every previous generation on that node is kept in a version history carousel, so you can go back to an earlier result if you don't like the new one.
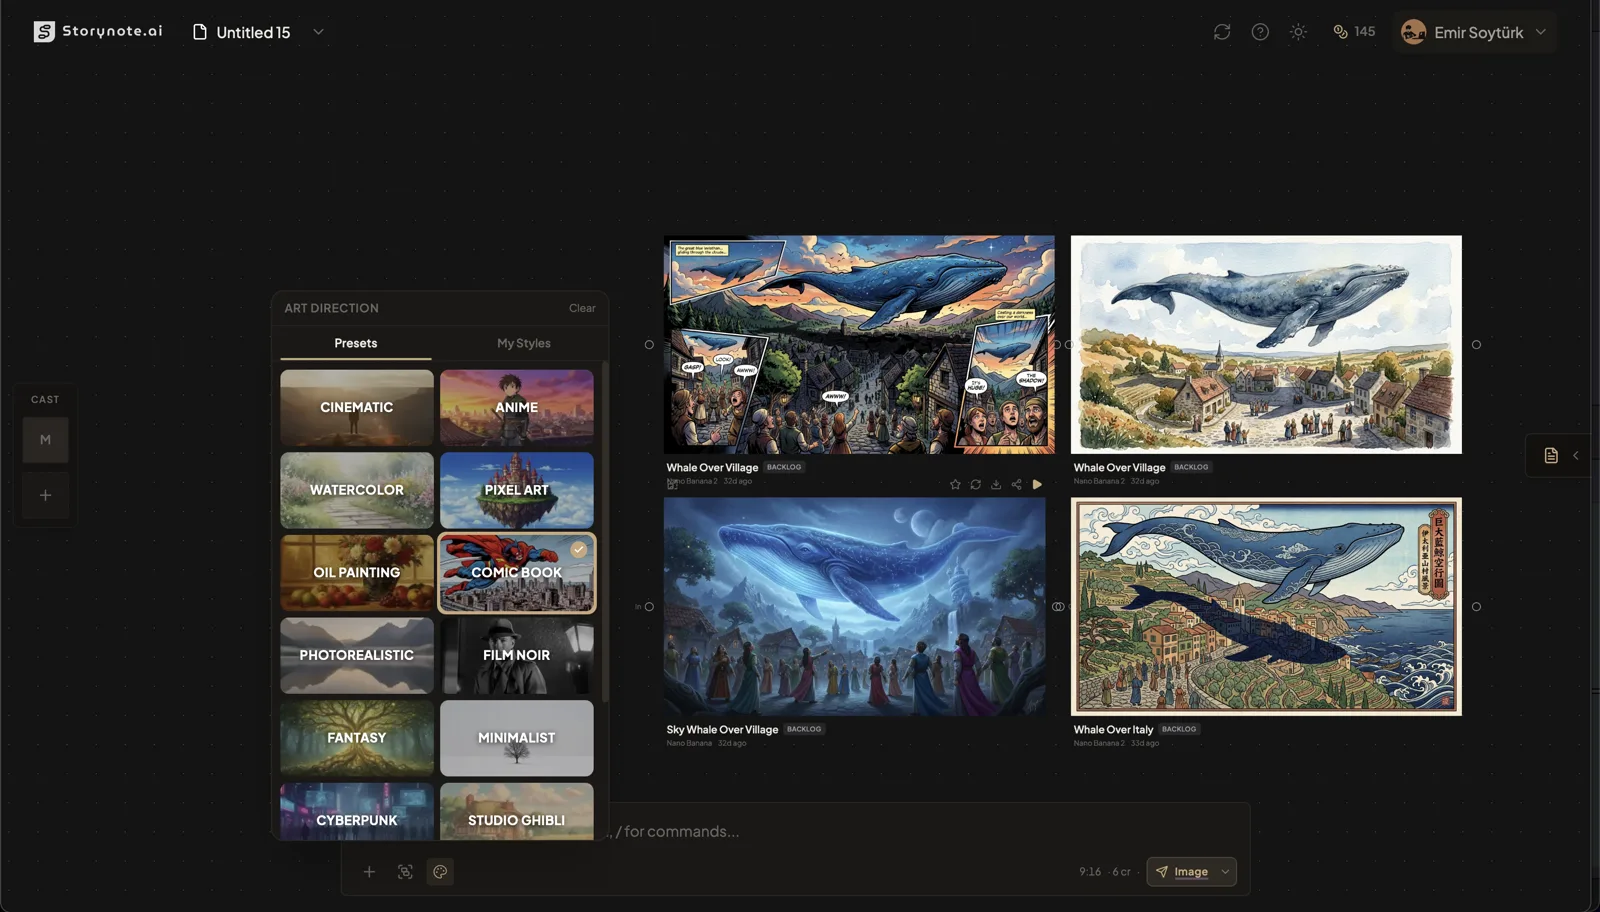
Style Switching: One Story, Any Look
StoryNote ships with sixteen built-in style presets: cinematic, anime, watercolor, pixel art, oil painting, comic book, photorealistic, film noir, fantasy, minimalist, cyberpunk, Studio Ghibli, vintage film, gothic, pop art, and ukiyo-e. Each preset is a carefully tuned art direction that gets applied on top of your scene description.
The magic of this feature is that your characters carry over. Switch a scene from cinematic to anime and Sarah stays Sarah — same hair, same clothes, same face — just drawn in a completely different style. This lets you prototype a children's book, a cyberpunk thriller, and a film noir detective story from the same characters without starting over.
You can set a project-level default style in project settings, and override it on any individual output node. Clicking the style selector on an output node shows a grid of preset cards, each with a preview thumbnail and a color badge, so you can see what each style looks like before committing.
Generating Video from Your Scenes
Video generation in StoryNote works the same way as image generation: set an output node to video mode, write a scene description, and connect whatever upstream inputs you need. StoryNote is smart about what kind of video you want based on what's connected:
- Text to video — no image connected. StoryNote generates the video directly from your prompt.
- Image to video — one upstream image connected. The video animates from that still.
- First and last frame — two upstream images connected, one to the first-frame handle and one to the last-frame handle. StoryNote interpolates between them for smooth transitions.
- Avatar video — a character element plus a sound node connected. Generates a talking-head clip of that character speaking the audio.
- Lipsync — an existing video plus a sound node. Re-generates the video with lips matched to the new audio.
Choose your duration from the dropdown (typical values are 4, 5, 6, or 10 seconds depending on the model), pick your tier, and generate. Videos take longer than images — usually a minute or two — so this is a good time to go generate another shot on a different output node while you wait.
Deep dive
Adding Voice, Sound Effects, and Music
A silent film isn't really a film. StoryNote has three kinds of audio generation, all in the same Sound node:
- Speech (TTS) — write dialogue, pick a voice, and generate a spoken audio clip. You can pick from a dozen built-in voices, or connect the sound node to a character with a voice reference attached to speak in that character's voice.
- Sound effects (SFX) — describe the sound you want ("thunder rolling across mountains", "footsteps on wet pavement") and StoryNote generates a short audio clip.
- Music — describe a mood or genre ("suspenseful orchestral, building tension") and generate background music for your scene.
Once you have audio, you can preview it inline on the canvas, download it directly, connect it to a video node for lipsync or avatar generation, or add it to the timeline in the editor.

Deep dive
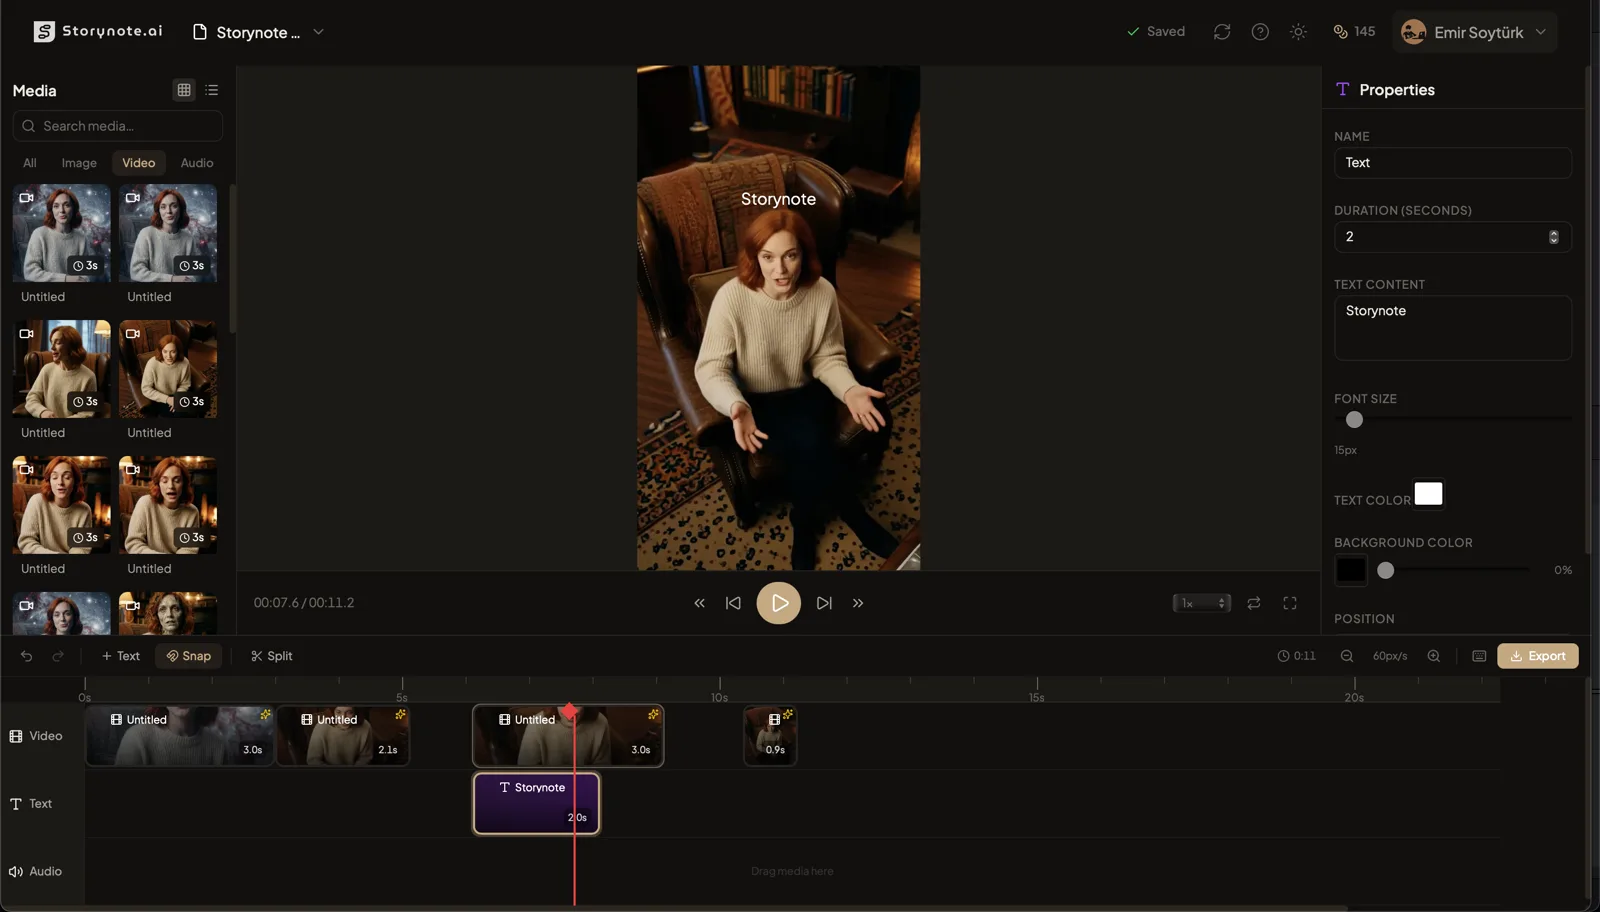
Assembling Your Film in the Timeline Editor
The canvas is where you generate assets. The timeline editor is where you turn them into a finished film. Open the editor from the top nav and you'll see three main areas: a media bin on the left with every asset you've generated, a preview player in the center, and a horizontal timeline at the bottom.
Drag clips from the media bin onto the timeline to add them to your film. Each clip can be trimmed, moved, split at the playhead, duplicated, and reordered. Click a clip to open the properties panel on the right, where you can set position, scale, rotation, opacity, fade in and out, cross-fade transitions, and visual effects like brightness and blur.
You can keyframe almost any property, so you can zoom in on a face over two seconds, fade music in gradually, or pan across a wide establishing shot. Spacebar plays and pauses, arrow keys seek, square brackets jump between clip boundaries, and the x key splits at the playhead — standard editor shortcuts that make assembly fast.
Ready to make your first film?
Create a StoryNote account, add credits, and generate your first scenes in minutes.